This is a series of post explains about Hosting Web Application using Azure IaaS Capabilities. Look at the end of this post for other parts.
In last two posts, we had created two VMs and hosted Northwind database in Database Server and Web Application on Web Server. The application is now accessible using the SITE URL from anywhere.
In this post, I plan to create image of Web Server and create multiple instances from the created image under the same cloud application. I also need to make sure all the servers must be load balanced with other Web Server, so the request will be equally distributed among all Web Servers. In this way, I can scale up or scale down the Web Servers whenever required.
Session maintenance in Web Application
Before going for creating image from the Web Server (NorthwindFE), I need to implement one more important concept in this POC, which is handling sessions.
As we are planning to create multiple instances of Web Servers from NorthwindFE VM image and make them load balanced, there will be issues on handling sessions. This is because; currently the sessions are stored in the memory (in-proc) on the server. When we implement multiple instances load balanced, the request will be routed to different server for the same screen. So the sessions must be stored in out-proc. We have multiple options to achieve out-proc session, whether SQL Server, State Server, Azure caching, Azure table service etc.,
In this POC, I am planning to use SQL Server (which we already have for Northwind database) for storing sessions.
Install ASP.NET Session database
Step 1: The first step is to create session tables in the SQL Server. So RDP to the Database Server (NorthwindBE VM) and open the command prompt. Navigate to the C:\windows\Microsoft.NET\Framework\v4.0.30319 directory and run the following command.
aspnet_regsql –S localhost –U sa –P password@123 –ssadd –sstype p

for more information, refer the following url –
ASP.NET SQL Server Registration Tool
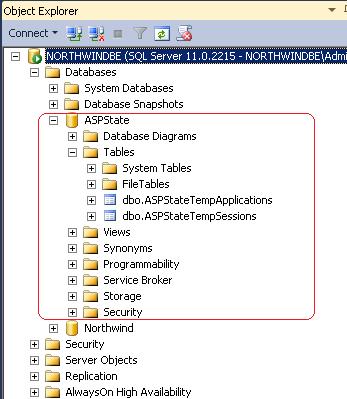
Once the command ran successfully, there will be a database ASPState created in the SQL Server with two tables as below.
Changing the Application Web.Config
We have setup the database server to receive the session from the Web Server. We also have need to change the Web Application pointing to out-proc session.
Step 1: RDP to the Web Server (NorthwindFE) and open the Web.config file of the application. Add the sessionState node under the system.web node.
<sessionstate cookieless="false" mode="SQLServer" sqlconnectionstring="data source=NORTHWINDBE;user id=sa;password=password@123" timeout="20">

Note: Change the SQL Server user id, password and data source as per your environment.
Step 2: Now run the application and verify the application by navigating some pages in the gridview and editing some records. It must run properly. Also test by accessing with more than one system.
Note: You can restart the IIS server if the changes are not taken effect.
Step 3: Open the SQL Server Management Studio and run the following command to verify the session values.

As mentioned in the configuration and the screenshots, each session has 20 min life time.
Step 4: Now run the application and verify whether it works properly.

Now we have completed the entire configuration for out-proc session management. We will start creating image from Web Server VM and use it for hosting multiple VMs from next post.
The other links on Hosting Web Application using Azure IaaS capabilities:
- Hosting Web Application using Azure IaaS capabilities - Part 1
- Hosting Web Application using Azure IaaS capabilities - Part 2
- Hosting Web Application using Azure IaaS capabilities - Part 3
- Hosting Web Application using Azure IaaS capabilities - Part 4
0 Responses to “Hosting Web Application using Azure IaaS capabilities - Part 3”
Post a Comment