Showing posts with label Azure. Show all posts

Monday, 24 December 2012

Achieving High Availability with Windows Azure Environment - Part 3


  1. Windows Azure SQL Database

    SQL Azure Database provides 99.9 percent availability by default to the subscribers.
    When creating a database in SQL Azure server, the database will have three replicas on three different and fully independent physical machines with in the same data center. In three replicas, one will act as primary replica and two others will act as secondary replicas. The architecture of the SQL Database will be defined as below
    Figure 3
    A single SQL Database distribution across machines in a datacenter (Image from Microsoft wiki page - link)

    As defined in the picture, the database DB1 is created three machines - Machine 4, Machine 5 and Machine 6 which are fully separated from each other from the hardware, network and the SQL Server instances. In this three database, one will act as primary and two other will act as secondary.

    All reads and writes against the database (DB1) will done only in primary replica and the changes to the primary replica will be replicated to the secondary replicas asynchronously in background. Any transaction will be considered as completed if the transaction done against the primary replica and one secondary replica completed successfully.

    When the primary replica fails due to hardware failure, network failure or device failure, the SQL Database fabric detects the failure and fails over to one of secondary replica. The database will be inaccessible for a short period of time while the failover event is happening and the application needs to re-try the transaction to handle this failover event in the logic with the same connection string.

    The SQL Database is inaccessible due to hardware failure, operating system crash, or any issue with the SQL Server instance in the data center. When any of this failure happened, the reconfiguration process starts – is a process to create a new replica for the failed one.

    When any of the machines failed, the entire database in that machine required to be replaced by new. So the Partition Manager randomly selects a failed replica in the failed machine and start creating the database in to another machine and replicating the data into that. When the process completed, it will take another database and process it.

    The databases in the failed machine will be primary replicas and secondary replicas for different databases. The reconfiguration process will be little different for each of them.

    When Primary Replica failed, the Partition Manager chooses on of a secondary replica and promotes it as primary replica. The algorithm to choose one replica from the two replicas is undetectable by the users. But most of the case the least load secondary replica promoted as primary replica. When the primary replica failed, it sends a “disconnection” message to the client application when the client trying to do some transaction. As reconfiguration process will take up to 30 seconds, the client must be configured to reconnect the server again when “disconnection“message received to connect successfully.

    When Secondary Replica failed, the Partition Manager verifies the failure is due what issue. If the failure is due to clean failure such as system update, upgrade and reboot, it will not consider as actual failure as the replica is failed due to out of service. In short time, the failed secondary replica will come back to online and make the database in healthy status by running the necessary comments.

    But when the replica is not come to online for two hours (if clean failure) or the replica failed due to permanent failure (such as hardware failure, network failure), the Partition Manager will start building a replacement replica in another machine and bring the database online. The time it takes to copy the entire data will be depending on the size of the database.

    Addition to the three replicas, Windows Azure SQL database fabric maintains database backup for minimum 14 days and the backup will be taken for every five minutes interval. These backup files are stored in the same datacenter which will be used in case of major hardware and system failures at datacenter level.

    6.1 Protecting data from user deletions or modifications
    Sometime, the user can delete or modify the data for unwanted reason or unknown to them. In that situation, the database required to be restored back or a particular record need to be get back to the existing database. The only possibility to solve this situation is to take the database backup on regular interval and keep them in safe location for further reference/restore.

    SQL Azure provides multiple choices for backing up and restoring the database on regular interval. Some are follows –

    1. Database Copy command – Creating a copy of SQL Database to another new database in the same or another server (but in the same data center).
    2. Using BCP utility – Exporting and importing a database table to a flat file.

    For more information on each method, refer the Export and Import SQL Databases and Tables section (6.3).

    6.2 Protecting data from data center damage
    The Copy database command copies an SQL Database to another new database, which can be used for reference (when unwanted data deleted/modified) or can switch the database when major data corruption.

    We also required data protection at data center level, which will be helpful when a major damage happened at datacenter geographic location such as earthquakes, wild fires, tornados, nuclear reactor meltdown, etc. The solution for such major damage at data center level is to keep the database copy at different data center, means data at different geographic location.

    For Ex: Let’s take an example of an application and database deployed in East Europe datacenter. To keep the application and data protected from East Europe datacenter damage, the user must keep online application and database backup to another datacenter may it be a West Europe, South Central US or other datacenter.

    The different hosted service applications can be groups together using Traffic Manager, so when any damage at East Europe datacenter, the request can be routed to any datacenters which are online. But the database connection string configured to point to the East Europe datacenter. So the application must have the ability to verify the database active status for some time (may be 5 min), when the database not responding the necessary action must be taken to change the database either automatically or by manually.

    There are many ways to take the backup of the online database to other datacenters.

    Some are follows –
    1. SQL Database Import/Export Service
    2. SQL Data Sync
    3. Running Windows Azure Worker Role for syncing the data

    6.2.1 SQL Database Import/Export Service
    From the ways, the user can take the database backup to Blob Storage Service, to Azure Drive or an enterprise folder. Once the backup completed, the backup file must be transferred to other datacenter blob storage to protect the datacenter level damage.

    The backup file can be restored (and the file can be deleted) to make the database online, so the failover time will get reduced. But restoring to a new database or keeping the backup file in storage service will make the billing cycle to start additional costing to the enterprise addition to the data transfer cost.

    The SQL Database Import/Export service copied the database object schema and the data to a DAC export file (BACPAC). So when exporting a customer database, the output file would be customer.bacpac. The same file can be used to import to another database in the same server or another server.

    There are many methods for using DAC framework for importing and exporting the database.
    1. Import and Export option with Management Portal
    2. Using Data Tire Application (DAC) framework
    3. Using a open source tool for automating the SQL Azure backup

    6.2.2 SQL DataSync
    Windows Azure SQL Data Sync service is used for synchronizing the data in multiple ways –

    1. Synchronizing the data between SQL Azure database to another SQL Azure database in the same server or another server and in the same datacenter or between another datacenter.
    2. Synchronizing the data between SQL Azure database and on-premise SQL Server database.
    3. Synchronizing the data between SQL Azure database, on-premise SQL Server database and another SQL Azure database.

    When using the SQL Datasync service one SQL Azure database will act as hub and other databases will act as member databases in the sync group. The synchronization will run in minimum five minutes or maximum 1 month interval.

    So deploying the SQL Azure Data Sync, the SQL Azure Database can taken backup to another datacenter SQL Database or in enterprise SQL Server Database. When datacenter loss, the synchronized SQL Azure database can bring up to online or the on-premise database can be restored to Azure and bring to online.

    For more information please refer the following urls –
    http://msdn.microsoft.com/en-us/library/hh456371.aspx
    http://msdn.microsoft.com/en-us/library/hh667328.aspx
    http://msdn.microsoft.com/en-us/library/hh667301.aspx

    6.2.3 Running Windows Azure Worker Role for syncing the data
    This may seems to be a tedious method, but the user has the capability to customize the synchronization and can make sure the data synced at a given point of time.

    In this method, when any transaction happened to the database the data access layer will add a message in the queue which tells about what transaction required to take on what data. The worker role takes the message and processes it to different Azure database whether the database is in the same server or different server and different datacenters.

    6.3 Export and Import (Backup and Restore) SQL Databases and Tables
    Microsoft has given various ways for exporting and importing SQL databases or tables. Each can be used for various scenarios. Some of the ways are

    1. Database Copy command
    2. Import and Export option with Management Portal
    3. Using Data Tire Application (DAC) framework
    4. Using BCP utility
    5. Using a open source tool for automating the SQL Azure backup

    6.3.1 Database Copy command
    Database copy command helps us to copy the entire database to another new database in the same server or to another server. To make sure the data safe at any given point, the database copy operation can be started to make another copy of the same database. This operation can also be done in a regular interval either every day, every week, every hours etc.

    Once the database copy successfully, the copied database will work as a standalone database with the users exist in the server. So when copying the database to another server, we have to make sure the server has required users exist.

    The command for copying the database to another is
    CREATE DATABASE destination_database_name AS COPY OF 
    [source_server_name].source_database_name
    The database copy command work only when the targeted server in the same datacenter.

    Once the database copy process started, the progress about the operation can get by running the following command
    SELECT [databases].[name], [copies].* 
    FROM sys.dm_database_copies copies 
    JOIN sys.databases databases 
    ON copies.database_id = databases.database_id
    At any point of time, any unwanted transaction done, the copied database can be reviewed with the online database data values and make the necessary modification. If required, the database name can be changed from copied database to online database. So the application can run without any issues.

    Below is an example command for modifying the copied database to online database name.
    ALTER DATABASE Database1 
    MODIFY NAME = Database1_OLD
    GO
    WAITFOR DELAY '00:00:30'
    GO
    ALTER DATABASE Database1_copy_02_01_2012
    MODIFY NAME = Database1
    GO
    Some important notes when using Database Copy:

    • The copy command creates new database, which will be charged as per normal billing rate. The billing will starts after successfully completing the database copy operation.
    • As the database copy started by user manually, Windows Azure environment is not responsible for deleting the database when not required.
    • The charges for the new database created will also follow the same billing as defined for SQL Azure billing rate.
    • When restoring the database, the user needs to verify the required data exist in the copied database.
    • If the database is in federation and configured to one or more federation schema, the database copy operation will fail.

    For more information on database copy, please refer the following url
    http://msdn.microsoft.com/en-us/library/ff951631.aspx

    6.3.2 Import and Export option with Management Portal
    SQL Azure management portal provides facility to backup and restore the SQL Database. For more information on how to import and export database with Management Portal, please refer the following url.
    https://thirumalaipm.blogspot.com/2011/09/import-and-export-backup-and-restore.html

    6.3.3 Using Data Tire Application (DAC) framework
    Data Tire Application Component is a command line application, which talks to SQL Azure using APIs for importing and Exporting SQL databases. This tool can also be used for migrating on-premise SQL Server database to SQL Azure database.

    For more information, please refer the following urls –
    http://sqldacexamples.codeplex.com/
    https://thirumalaipm.blogspot.com/2011/09/import-and-export-backup-and-restore_18.html

    6.3.4 Using BCP utility
    BCP is another command line application which can be used for exporting and importing a single database table to/from a flat file.

    For more information, please refer the following urls –
    http://msdn.microsoft.com/en-us/library/ms162802.aspx
    https://thirumalaipm.blogspot.com/2011/10/export-and-import-backup-and-restore.html

    6.3.5 Using a open source tool for automating the SQL Azure backup
    For automating SQL Azure backup operations, Microsoft open source portal (codeplex.com) has a project Automating SQL Azure Backup using Worker role with Microsoft Public License (Ms-PL) agreement.
    The url is – http://azureautobackup.codeplex.com

  2. Reference
The other links on Achieving High Availability with Windows Azure Environment:
  1. Achieving High Availability with Windows Azure Environment - Part 1
  2. Achieving High Availability with Windows Azure Environment - Part 2
  3. Achieving High Availability with Windows Azure Environment - Part 3

Achieving High Availability with Windows Azure Environment - Part 2


  1. Windows Azure Storage Services

    Windows Azure Storage Services provides 99.9 percent availability by default to the subscribers.

    There are three types of storage services available with Windows Azure Storage service such as Blob, Tables and Queue. There are additional three storage types in preview currently which are Drives, Virtual Machine Disks and Virtual Machine Images. The SLA will be applicable only for three types of storage services that are in production (Blob, Table and Queue).

    Before understanding the high availability feature, we need to understand the architecture of storage services.

    Windows Azure Storage Service architecture has three layers and each of which does important process for a request. Above diagram shows the architecture of Azure storage services.

    Figure 3 - Windows Azure Storage Architecture
    .
    1. Storage Request – As defined in the picture any request on the storage service can be done using a unique DNS name (Ex: https://shell storage.blob.code.windows.net/). Once the request had been raised, it reaches to the allocated storage account server located in a region for that DNS name. This is done by Location Service by referring DNS entry and routing to the allocated server using VIP mapping. Then the request reaches to the Front-End Layer of the Storage service.
    2. Front-End (FE) Layer – This layer’s responsibility is to take the incoming request, authenticate and authorize the request and route the request to a particular partition server located in the Partition Layer. There are multiple partition servers in the Partition layer. To forward the request to a particular partition server, it refers Partition Map. Partition Map keeps track of the partition information of the storage service stored in the partition server and knows which partition stored in which partition server.
      Once the response comes from the partition layer for the request, it sends back to the client.
    3. Partition Layer – There are multiple partition servers in the partition layer. This server manages the partitioning of the entire data object. To distinguish the data to the different partition, storage service has a key concept knows as partition key which present in all the storage system such as blob, table and queue. The object belong to a single partition will be managed by a single partition server and each partition server can server many partitions.
      This server also provides an automatic load balancing of partitions across the servers to meet the traffic needs of blob, tables and queues.
      This layer takes responsibility to read data from the DFS servers and to send request to store them into primary DFS server.
      • When a request arises for reading data (GET), it verifies the data presented in the cache memory. If presented, it returns the data directly from cache memory. If not, sends a request to read from one of the DFS server which is holding the replicas of the data.
      • When a request arises for adding/modifying/deleting data (PUT/POST/DELETE), it sends the request to the primary replica for insert, update or delete.
    4. Distributed and replicated File System (DFS) Layer – This is the layer stores the actual data in to the disk and also manages the distribution and replication of data across many servers to keep the data durable.\

      For operations insert, update and delete, it will complete the transaction on the primary replica and replicate to the other replicas then returns the status to the partition layer. For read request, it reads data from the disk and returns the result to the partition layer.

    5.1 Fault Domains and Server Failures
    As discussed in the Azure Compute services, the servers of these three layers are sits in different fault domains. Each fault domain is separates from others and has dedicated network, power and hardware specifications. So at any given time any of the fault domain fails, it never impact other fault domain and the servers in the other fault domain can response to the request raised from client.

    As Storage service has three layers, any server failed due to any reason other server on the same layer takes the responsibility to process the request.
    • Front-End Server Failure – When front end server failed (due to any reason such as network failure, hardware failure), the load balancer realizes and updates the server status as unavailable in the data store. So when any request comes from the client to VIP, the load balancer will not route the request to the failed front-end server and route to the available servers.
    • Partition Server Failure – When the partition server is unavailable, the storage system realize the same and immediately reassign the partition it was serving to another available partition server and update the status into the Partition Map. So for another request, it won’t assign any partition to the failed partition server.
    • DFS Server Failure – When a DFS server is unavailable, the partition server stops requesting to the failed DFS server and route the request to another available replica which will be located in another fault domain. When DFS server is unavailable for long time, the fabric controller will generate a new DFS server replica and bring online.

    5.2 Upgrade Domains and Rolling Upgrade
    Windows Azure provides 99.9% availability on Storage service using fault domain and upgrade domain as cloud services follows. As shown in Figure #1, the fault domain and upgrade domain is a horizontal and vertical diversion on hardware. So servers of each three layers are sites in different fault domain and upgrade domain for the storage services.

    When a server in fault domain does down, the users lose 1/x of server for the respective layer (where x is the number of fault domain). The same way, when any server goes down during the upgrade, the user loses 1/y of server till the completion of upgrade (where y is the number of upgrade domain).

    When upgrading a particular layer, there will be multiple activities carried out before and after the upgrade to make sure the process not impacting others. The upgrade will be done a single upgrade domain at a time, so if there are x upgrade domain available there will be (100/x) % of servers will be consider for upgrade and will mark those server status unavailable to not route any request before upgrade process starts.

    Once the upgrade process completed for any server, there will be a validation process to make sure everything running properly. Once the validation successful, the server status will mark as available and the servers can take the request for processing. When anything goes wrong while upgrading the domain or the validation not completed successfully, the servers will be rollback to the previous version of the production software.

    5.3 Geo-replication
    Windows Azure Storage services will be highly available using the upgrade domain and fault domain concept, which limited to the single datacenter. But geo-replication on storage services helps to keep additionally one replica to another datacenter which is hundred miles difference from the specified datacenter (but in the same region).

    The geo-replication on storage services helps from major disaster on datacenter level such as earthquakes, wild fires, tornados, nuclear reactor meltdown, etc. and allows keeping a copy of the data in to another datacenter.

    5.3.1 Primary and secondary locations in Geo-replication
    When creating a storage account, the customer will be selecting the datacenter where the data must be located such as North Central US, South Central US, East US etc., This datacenter will be termed as primary location on which all the read, write goes to that storage services.

    The secondary location will be determined automatically using the following mapping table when selecting the primary location. The Windows Azure constantly maintains multiple healthy (three) replicas of data on both the location.

    Primary Secondary
    North Central US South Central US
    South Central US North Central US
    East US West US
    West US East US
    North Europe West Europe
    West Europe North Europe
    South East Asia East Asia
    East Asia South East Asia

    5.3.2 LRS Vs GRS

    Microsoft Term the two storage categories as below –
    1. Locally Redundant Storage (LRS), which is referring the three replicas located in the primary location. It means, when creating a storage account, the customer provides the datacenter name where it suppose to locate. Windows Azure provision three replicas of storage services such as blob, tables and queues in the same datacenter with different fault domain and upgrade domain as mention earlier. This provides high availability when a particular hardware on a datacenter goes down.
    2. Geo Redundant Storage (GRS), which refers the Geo-replicated storage service. The location will be decided by Windows Azure (as defined in table). When writing any data on LRS, Azure will write in the primary replica and replicate to the other two replica. Once the transaction in LRS completed successfully, the same will be replicated to the GRS asynchronously in background.
      This storage also keeps three replicas as the LRS has and replication across three replicas will happen in the same way done in LRS.
      Note: The queue storage data will not be replicated to GRS as of now.

    5.3.3 Cost impact on Geo-replication
    There is no addition cost for Geo-replication of Windows Azure Storage service. So customer need not to pay for the additional replicas located in secondary location.

    When creating a storage account, Azure creates the replicas in another datacenter which is hundred miles from the datacenter in the same region. Once the replicas created, the data will be replicated asynchronously. There is no cost billed for creating replicas, data transfer etc.

    Windows Azure also provides an option to turn off the Geo replication when required. In that situation, Microsoft decides that data in the primary location is falls under categories of non-critical or temporary data, data that can be recreated if the data is lost from other resource. By turning off the Geo-replication facility, the data in secondary location will be deleted completely and customer will get the price discount from 23% to 34% depending upon the data size.

    The customer can turn on the Geo-replication again if required. But it triggers the billing for one time bandwidth charge to bootstrap the data from primary to secondary location (LRS to GRS). The amount of bandwidth charged for the bootstrap will be equal to the amount of data in the storage account at the time of bootstrap. Once the bootstrap is completed, there is no billing for normal replication of data from primary to secondary location.

    5.3.4 Geo-Failover
    When a primary location goes down due to major disaster, the Windows Azure team will try to restore the primary location. If it is major disaster and not be able to restore easily, the geo-failover process will start.

    In the geo-failover process, the customer will be notified about the issue and the impact via the subscription contact information and the DNS entry will be updated to point to the secondary location from primary location. So all the traffic will be routed to the secondary location as the DNS updated to point to secondary location. The secondary location will be referred as primary location once the failover process completed successfully.

    Note: There is no code change required in the application as everything will be handled by Windows Azure.

    Once the datacenter affected by major disaster comes up, the secondary replica will be created and data will be replicated.

The other links on Achieving High Availability with Windows Azure Environment:
  1. Achieving High Availability with Windows Azure Environment - Part 1
  2. Achieving High Availability with Windows Azure Environment - Part 2
  3. Achieving High Availability with Windows Azure Environment - Part 3

Friday, 21 December 2012

Achieving High Availability with Windows Azure Environment - Part 1

Technology is growing tremendously, the world is becoming more closer day by day. When a started my studies, peoples were using telegram for sending messages in a quick time. But now the mobile technologies becomming powerfull and the new spectrum releases such as 2G, 3G and 4G change the world to make everything possible with internet. Cloud computing is one of them, which make the business to be able to host whole/part of their business on cloud and achieve the hardest possible in easiest way.

When one of my friend travels for a business visit to US, he needs to work his company network for some deliverable. Cloud computing helps him lots as their company hosted a part of their network on cloud and created VPN connectivity to their enterprise network. He just needs to get connected with internet and connect to their VPN on cloud. He connected with the internet using a satellite internet provider - hughes net internet and completed his deliverables easily.

Cloud computing technology provides lots of flexibilities, some of them are - scalability, availability and pay per usage etc. In this article, I am planning to point out some of the availability features from Microsoft Azure which can be used for achieving high availability on cloud.

Note: This three page article talks about the features which are in production with Microsoft Azure such as Cloud Services, Storage Services, and SQL Azure. This article not talks about Virtual Machine, Networking etc.
  1. Cloud Provider - Windows Azure
    Windows Azure is an open cloud platform that enables the customer to develop their application on their own platform and deploy on to Microsoft managed datacenters. It also enables to monitor and manage the hosted application in multiple ways such as Management console, Power Shell script or application APIs.

    There are various advantages Windows Azure provides apart from the cost benefits such as High Availability, Scalability etc. This paper provides information about achieving High availability on Windows Azure environment.

    High Availability
    Wikipedia defines the High availability as - High availability is a system design approach and associated service implementation that ensures a prearranged level of operational performance will be met during a contractual measurement period.

    High availability calculation
    The high availability will be measured by the downtime of the system where the end user being unable to access the application. The downtime can be categorized in two types – Scheduled and unscheduled.

    Scheduled downtime – This downtime occur due to system maintenance such as applying patches to the system software, OS update etc., This can be planned well in advance and take precaution before it starts.

    Unscheduled downtime – This downtime occur due to network failure, power outage, CPU/RAM failure, application/system crash etc., As this downtime can’t be predicted before, it require more consideration for achieving high availability.

    The Service Level Agreement will be calculated based on the percentage of the availability defined for the system. Following table shows the availability percentage and corresponding downtime period.

    Availability % Downtime per year Downtime per month Downtime per week
    90% ("one nine") 36.5 days 72 hours 16.8 hours
    95% 18.25 days 36 hours 8.4 hours
    97% 10.96 days 21.6 hours 5.04 hours
    98% 7.30 days 14.4 hours 3.36 hours
    99% ("two nines") 3.65 days 7.20 hours 1.68 hours
    99.5% 1.83 days 3.60 hours 50.4 minutes
    99.8% 17.52 hours 86.23 minutes 20.16 minutes
    99.9% ("three nines") 8.76 hours 43.2 minutes 10.1 minutes
    99.95% 4.38 hours 21.56 minutes 5.04 minutes
    99.99% ("four nines") 52.56 minutes 4.32 minutes 1.01 minutes
    99.999% ("five nines") 5.26 minutes 25.9 seconds 6.05 seconds
    99.9999% ("six nines") 31.5 seconds 2.59 seconds 0.605 seconds
    99.99999% ("seven nines") 3.15 seconds 0.259 seconds 0.0605 seconds

    Considering the Azure services, SLA varies for each component. The following table shows the SLA for each component that Microsoft offer.

    Azure Services SLA Terms Current SLA information
    Cloud Services 99.95% 2+ instances http://go.microsoft.com/fwlink/?LinkId=159704
    Storage 99.9% See the URL http://go.microsoft.com/fwlink/?LinkId=159705
    SQL Database 99.9% See the URL http://go.microsoft.com/fwlink/?LinkId=159706
    SQL Reporting 99.9% See the URL http://go.microsoft.com/fwlink/?LinkId=253477
    Service Bus 99.9% See the URL http://go.microsoft.com/fwlink/?LinkId=159707
    Access Control 99.9% See the URL http://go.microsoft.com/fwlink/?LinkId=159707
    Caching 99.9% See the URL http://go.microsoft.com/fwlink/?LinkId=159707
    CDN 99.9% See the URL http://go.microsoft.com/fwlink/?LinkId=195943

  2. High Availability on Windows Azure by Default
    Windows Azure provides High Availability for all the applications deployed on it by default. Below is some reason for Windows Azure environment provides high-availability.
    1. Microsoft sets up world class datacenters in multiple geo-locations across the globe. So when any data center goes down by geo damage such as earthquakes, wild fires, tornados, nuclear reactor meltdown, etc., the other data center can take advantage to respond to the user request.
    2. The datacenters are designed and constructed with stringent levels of physical security and access control, power redundancy and efficiency, environment control, and recoverability capabilities.
    3. The physical facilities on a datacenter are achieved by broad industry compliance, including ISO 27001 and SOC / SSAE 16 / SAS 70 Type II and within the United States, FISMA certification.
    4. To ensure the recovery of the Windows Azure platform core components, Microsoft established an Enterprise Business Continuity Program based on DRII Professional Practice Statement (link) and BCI Good Practice Guidelines. This program also aligns to FISMA and ISO27001 Continuity Control requirements.
    5. Azure provides build in network load balancing, automatic OS and service patching.

  3. Windows Azure Cloud Services

    Azure Cloud Services provides 99.95 percent availability by default to the subscribers.

    Windows Azure Compute Services provides high availability by deploying the instances into totally isolated grouping of hardware and network devices which is known as fault domain and upgrade domain. To achieve this implementation, the role must be deployed with at least two instances.

    Fault domain is a physical unit which acts as the separate rack with dedicated hardware and network infrastructure for deploying VMs. When deploying a role with two instances, Windows Azure Fabric controller will deploy each instance in different fault domains such as Instance #1 in Fault Domain #1 and Instance #2 in Fault Domain #2. Developer will not have any control on allocation of fault domain either by configuration or API call.

    Upgrade domain is a local unit which determines how the role will be upgraded. This allows separating the instances in a role to different upgrade domain and upgrade one by one while upgrading the role.

    Figure 1 - Cloud Service Upgrade Domain and Fault Domain representation

    As per the above figure #1, there are four instances deployed on Azure with two fault domains and two upgrade domains. So when Fault Domain #1 fails due to any issues such as network failure or hardware issue, Fault domain #2 (instance #2, instance #4) will be available to respond to the user. The Fabric Controller will notice the instances #1 and instance #2 does not respond in short time and will redeploy in another fault domain other than Fault Domain #2 and bring active.

    While upgrading software patches or configuration changes, the changes will apply in upgrade domain #1 (instance #1 and instance #2) at first and Upgrade domain #2 (instance #2, instance #4) will be available to response to the user. When the Upgrade domain #1 completes the upgrade, the upgrade domain #2 (instance #3 and instance #4) will start the upgrade and upgrade domain #1 will be available to response to the user.

    The allocation of fault domain and upgrade domain will be handled by fabric controller and it will be depending on the cluster availability on the time of deployment.

    As explained, while deploying computing service such as Web Role, Worker Role or VM Role with more than one instances, Microsoft ensure the deployment to be in different fault domains. So the application always available even any of the fault domain fail and other fault domain takes the responsibility to respond back to the user.

    4.1 Windows Azure Traffic Manager
    As we seen previously, one Cloud service provides 99.95% availability by default. So, the application hosted on Azure with Web Role or Worker Role (or both) with two instances count will make sure the application available at 99.95% rate and the downtime could be 1.83 days in a year / 3.60 hours in a month / 50.4 minutes in a week.

    When the enterprise expecting more availability, such as 99.9, 99.99 etc., Windows Azure released a component calls Windows Azure Traffic Manager which allows the user to host the same application in multiple region (or in same region) and combine together in a single domain URL. When a user requesting the URL provides by Traffic Manager, the request first goes to the Traffic Manager Load Balancing module and that will be routed to the other cloud services based on the rules defined.

    For Example, An enterprise wanted to host a Sales Order application to Windows Azure Environment which will be consumed by all the customers across the world. The application expected to give higher availability rate (>99.95). In such scenario, Windows Azure allows the enterprise to do the following.

    1. Host the same application in different region. The region can be selected where the most of the users are expected the use the application.
      For Ex: An application hosted in three regions, the URL follows
      http://salesorderus.cloudapp.net/
      http://salesordereurope.cloudapp.net/
      http://salesorderasia.cloudapp.net/
    2. Create a Traffic Manager Policy with any rules suites for the enterprise requirement and choose a common DNS prefix for the policy.
    3. Activate the policy. When activation completes, Traffic Manager configure required settings and give a complete URL which can be used for requesting all three cloud services hosted in different region.
      For Ex: http://salesorderenterprise.trafficmanager.net/
    4. When enterprise configure a DNS entry of enterprise custom DNS to traffic manager domain, the user will be requesting the application using enterprise domain url. For Ex: http://shellappdomain.shell.com
    5. The user can request the application with the traffic manager URL instead of cloud service URL. By requesting the Traffic Manager URL, Traffic manager make sure to route to the correct cloud services based on the rule and the cloud service current status.

    Figure #2 explains the conceptual diagram of how Windows Azure Traffic Manager works –

    Figure 2 - Conceptual Diagram how Windows Azure Traffic Manager works

    1. The user requests information using the application domain name. The process to resolve a DNS name to an IP address begins.
    2. The DNS resource record for the application domain points to a Traffic Manager domain maintained in Windows Azure Traffic Manager.
    3. Traffic enters through the domain and the policy dictates how to route that traffic.
    4. Traffic Manager Policy uses a chosen load balance method and monitoring status to determine windows Azure hosted service should service the request.
    5. Traffic Manager returns the DNS name of the hosted service to the IP address of a chosen hosted service to the user. The user's local DNS resolver resolves the domain to the IP address of a chosen hosted service.
    6. User calls the hosted service directly using the returned IP address. The user continues to interact with the chosen hosted service until its local DNS cache expires.

    4.1.1 Load balancing methods in Windows Azure Traffic Manager
    There are three types of load balancing method available in Traffic Manager. We can choose only one method per policy and there can be multiple policies can be declared for a single hosted service.

    4.1.1.1 Performance
    When there is a single application deployed in multiple hosted services each hosted different region, the Performance load balancing method determine the traffic origin and routes to the closest datacenter. As the traffic occur near to the user, the performance achieved as much as possible.

    The closest datacenter determined by Traffic Manager using a network performance table which has the round trip time between various IP addresses and each Windows Azure datacenter. This table will be updated at periodical intervals and reflecting the real time performance updates across the Internet.

    Performance method does not consider about the load of a particular datacenter when the load are getting heavy. It considers the closest datacenter to the user and route accordingly.

    4.1.1.2 Failover
    When a policy declared with Failover load balancing method, the first hosted service will be consider as the primary hosted service and the subsequent hosted services will be taken for the next preference.

    When the primary hosted service is offline for reason such as datacenter goes down, major damage on the region, the next hosted service in the list will take preference and respond to the user requests. When 1st and 2nd hosted services goes offline, the request will be routed to the 3rd hosted service on the list and so on.

    This method helps to achieve high availability requirement on enterprise applications.

    4.1.1.3 Round Robin
    This method slits up the incoming traffic from the user to various hosted services. So all the hosted services will be getting equal traffic loads. Traffic Manager will keeps track of the last hosted service that received the traffic and sends to the next one in the chosen list on the policy.

    When monitoring setup with the policy, the traffic manager will not route to the hosted service which are offline.

    4.1.2 Monitoring the hosted service using Traffic Manager
    Windows Azure Traffic Manager can monitor the hosted services to ensure they are available. This monitoring must setup for every policies.

    The Traffic Manager will try to access the default directory of the service in the policy when “/” chosen to monitor.

    To monitor a specific path and filename, the following steps can be done
    1. Create a file with the same name on each hosted service which plan to include in the policy.
    2. Allow the traffic manager to perform a http(s) GET on the file.
    3. Specify the monitoring endpoint for the files to monitor in the Specify a monitoring endpoint section of Create Traffic Manager Policy screen. There are three values required to specify,
      • Protocol – The file required to access in https or https.(Ex: http)
      • Port – Which port the application is running or the port used to request the file. (Ex: 80 for http)
      • Relative – The path and the name of the file that monitoring system will attempt to access. (Ex: /WATMMonitorfile.htm)

    4.1.3 Monitor poll state alert
    Traffic Manager displays policy and hosted services health in the Management Portal. The poll state column displays the most recent monitor status of the Traffic Manager policies. This status helps to understand the health of the domains according to the Traffic Manager monitoring settings. When the policy is health, DNS queries will be distributed to the hosted services based on the policy selected.

The other links on Achieving High Availability with Windows Azure Environment:
  1. Achieving High Availability with Windows Azure Environment - Part 1
  2. Achieving High Availability with Windows Azure Environment - Part 2
  3. Achieving High Availability with Windows Azure Environment - Part 3

Saturday, 8 December 2012

Creating VPN and Hosting Web application on Azure - Part 4


In last posts, we had created VPN and one Azure VM. We also installed Domain Controller on the Azure VM. In this post, I am planning to create three Azure VMs with SQL Server 2012 Image and configure mirroring. We will use this SQL Server for connecting from the Web Server in future posts.

The following Steps for creating first SQL Server 2012 VM under the VPN on Azure.

Creating first SQL Server 2012 VM

Step 1: Open the Management Portal and press NEW --> COMPUTE --> VIRTUAL MACHINE --> FROM GALLERY.


Portal will popup to select the Image.

Step 2: Select Microsoft SQL Server 2012 Evaluation Edition and press Next.


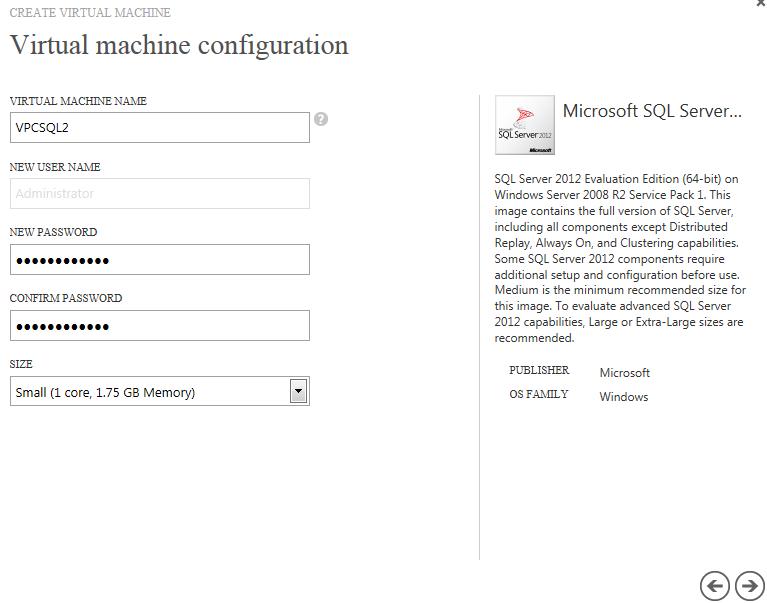
Step 3: Provide the Virtual Machine Name and password. Select the Size of the VM and press Next.


Step 4: As I creating these three SQL VMs under VPN, I don’t have to connect to any particular VM while creating it. Because, all the VMs under the VPC/VPN are connected together and any VM created on the network can able to communicate with SQL Server instances.

Also to note, when choosing STANDALONE VIRTUAL MACHINE, Azure will create a new cloud service and keep the VM under the cloud service and when choosing CONNECT TO AN EXISTING VIRTUAL MACHINE, it will keep the VM under the existing cloud service which was created for the connected VM. This concept is useful for combining more than one VM under a same cloud service and makes them load balanced and set highly available.

In this scenario, I am planning to keep all three SQL VM under a single cloud service and make them highly available (using Availability Set). This will make sure if once VM goes down, other VM can respond back.

In the next screen, provide the DNS Name of the cloud service and select storage account. Select the VPN which was created in the first post of this series. The VPN/VPC will show under the Virtual Networks in the dropdown.

Select the Back End Subnet (BE Subnet) in the VIRTUAL MACHINE SUBNETS dropdown box. This is a concept network for segregating the VMs into different subnets.


Press Next.

Step 5: In the next screen, select the Create availability set from the AVAILABILITY SET dropdown. Enter the Availability Set name (a unique name) in the text box and press Complete.

Availability set: The concept of availability set is used for keep the VMs in to totally different rack. So, it ensures the VMs are physically separated each other such as hardware, software, power, network etc., Because the VMs are separated each other, if one VM got some issue such as hardware failure, network failure, power failure etc., the other VM is still available for responding. In this way, we can make sure the VM are highly available.


Azure will create a new VM and keep it under the VPC selected.

Creating another two SQL Server VM

Now we have created one SQL Server 2012 VM, we need to create another two SQL Server VMs for configuring SQL Mirroring.

The SQL Mirroring is used for achieving high availability on SQL Server. SQL Mirroring can even possible to configure with two SQL Server instances. But, when using three SQL instances one will act as primary instance, one will act as mirroring instance and third will act as witness server. When primary fails, the mirroring instance will become active. All reads, writes goes always to primary instance and will be replicated to mirror instance.

(Note: Microsoft informed SQL Mirroring is planned for depreciation and introduced Always On Availability Groups with SQL Server 2012 version. Currently SQL Server 2012 image on cloud won’t support this feature. So I am using SQL Mirroring.)

Step 1: Create a new VM as the same way by pressing NEW button and selecting NEW --> COMPUTE --> VIRTUAL MACHINE --> FROM GALLERY. Select Microsoft SQL Server 2012 Evaluation Edition and press Next.

Step 2: Provide the Virtual Machine Name and password for the second SQL VM. Select the Size of the VM and press Next.


Step 3: In the next screen, choose CONNECT TO AN EXISTING VIRTUAL MACHINE and select first SQL Server DNS. Make sure the BESubnet selected.

I am selecting an existing SQL Server VM as I want both the VM to sit under same cloud service and I can make them in different Availability set.


Press Next.

Step 4: Select the SQL Mirroring in the AVAILABILITY SET dropdown. (Remember, this is the availability set we created when creating first SQL Server VM).


Press Complete to create VM.

Step 4: As we created the second SQL Server VM, create another one VM (for Witness server) with VPCSQL3 as VM Name.


Creating SQL Server VMs from Powershell script

We can even create these three SQL Server VMs from PowerShell script also. Below is the script which will complete the jobs of creating all three VMs and updating them in Availability Set.
Set-AzureSubscription -SubscriptionName "Subscription-1 Introductory special" -CurrentStorageAccount azurevpntest

$dns = New-AzureDns -Name 'testazuredc.com' -IPAddress '10.79.1.4'

$pass = 'password@123'
$iisimage = 'MSFT__Windows-Server-2012-Datacenter-201210.01-en.us-30GB.vhd'

$iisvm1 = New-AzureVMConfig -Name 'RVPCSQL1' -InstanceSize Small -ImageName $iisimage -AvailabilitySetName SQLMirror |
 Add-AzureProvisioningConfig -WindowsDomain -Password 'password@123' -Domain 'testazuredc' -DomainPassword 'password#123' -DomainUserName 'testazuredc.com\administrator' -JoinDomain 'testazuredc.com' |  
 Set-AzureSubnet -SubnetNames 'BESubnet'
 
$iisvm2 = New-AzureVMConfig -Name 'TVPCSQL2' -InstanceSize Small -ImageName $iisimage -AvailabilitySetName SQLMirror |
 Add-AzureProvisioningConfig -WindowsDomain -Password 'password@123' -Domain 'testazuredc' -DomainPassword 'password#123' -DomainUserName 'testazuredc.com\administrator' -JoinDomain 'testazuredc.com' |  
 Set-AzureSubnet -SubnetNames 'BESubnet'

$iisvm3 = New-AzureVMConfig -Name 'VPCSQL3' -InstanceSize Small -ImageName $iisimage -AvailabilitySetName SQLMirror |
 Add-AzureProvisioningConfig -WindowsDomain -Password 'password@123' -Domain 'testazuredc' -DomainPassword 'password#123' -DomainUserName 'testazuredc.com\administrator' -JoinDomain 'testazuredc.com' |  
 Set-AzureSubnet -SubnetNames 'BESubnet'

# Create Azure Cloud Service and Create VMs
#New-AzureVM -ServiceName 'TSQLMirroring' -VMs $iisvm1, $iisvm2, $iisvm3  -AffinityGroup 'DNTAG' -VNetName 'DNTVPN' -DnsSettings $dns
In some situation, we might created some VMs from the Management portal and wanted to add other VMs from Power shell. The following script I creating a VM (VPCVM3) and adding to the existing cloud service under the same VPN.
Set-AzureSubscription -SubscriptionName "Subscription-1 Introductory special" -CurrentStorageAccount azurevpntest

$dns = New-AzureDns -Name 'testazuredc.com' -IPAddress '10.79.1.4'

$pass = 'password@123'
$iisimage = 'MSFT__Windows-Server-2012-Datacenter-201210.01-en.us-30GB.vhd'

$iisvm3 = New-AzureVMConfig -Name 'VPCSQL3' -InstanceSize Small -ImageName $iisimage -AvailabilitySetName SQLMirror |
 Add-AzureProvisioningConfig -WindowsDomain -Password 'password@123' -Domain 'testazuredc' -DomainPassword 'password#123' -DomainUserName 'testazuredc.com\administrator' -JoinDomain 'testazuredc.com' |  
 Set-AzureSubnet -SubnetNames 'BESubnet'

# Create Azure Cloud Service and Create VMs
New-AzureVM -ServiceName 'SQLMirroring' -VMs $iisvm3

If you note, I am not providing the VPN name, Affinity Group or DNS settings details. When none of this three information provided and the cloud service is already exist, then the VM will add to the existing cloud service.

Adding VMs to the domain controller

Joining the VMs to DNS

Once the VM added by joining a domain controller, we can login with the domain credentials. In Azure, the machines are created in domain join and login is happening with AD credentials. But the computer is still running in workgroup. Not sure what is happening. So I need to join the computer by configuring IP address of the domain controller and joining to the DNS.

So, open each of the system and repeat the following steps to join the domain.

Configuring DNS IP Address

Step 1: Open the Network and Sharing Center and Local Area Connection 4 window. Press Properties to get the properties window.


Step 2: Select the Internet Protocol Version 4 (TCP/IPv4) and press Properties.


Step 3: Provide the IP address of the Domain Controller VM IP address.


Step 4: Press OK and close all the windows.

Joining the Computer to Domain

Step 1: Open the system Properties and select the Change Settings under Computer name, domain, and workgroup settings.


Step 2: Press Change in the System Properties window. Select the Domain from the Member Of section and provide the domain name.


Step 3: Provide the AD credentials for joining to the domain.


You will get the Welcome message. Press OK to continue. The system will restart after your confirmation.

Verify the system properties to get to know the computer is joined to the domain.


The same can be repeated for other two systems to join into the domain controller.

In the next post, I will walkthrough configuring SQL Mirroring using these three VMs.

Thursday, 29 November 2012

Creating VPN and Hosting Web application on Azure - Part 3


In previous post, we had created an Azure VM with Windows Server 2012 operating system under DNSSubnet in the VPN we created at the first post. In this post, I am planning to install active directory, which will be used for configuring SQL Server Mirroring.

One thing to note here, there is no prerequisite to have active directory for the web application which we are going to publish on the Web Server (next post). But, for SQL Server Mirroring require active directory user for configuration.

The following steps walkthrough the installation of Active Directory role.

Step 1: Connect to the VM (DNTDNSVM) and select Manage --> Add Roles and Features from the Server Manger window.


Step 2: The system will open the Add Roles and Features Wizard.


Press Next in the Before you begin screen.

Step 3: Select Role-based or feature-based installation option in the Select installation type screen.


Press Next.

Step 4: In the Select destination server screen, the VM created in the previous post (DNTDNSVM) will be selected by default.


Press Next.

Step 5: Select Active Directory Domain Service in the Select server roles screen.


On selection of Active Directory Domain Service item, the Add Roles and Features Wizard window will popup.


Press Add Features.

Press Next in the Select server roles screen.

Step 6: Press Next in the Select features screen.


Step 7: Press Next in the Active Directory Domain Service screen.


Step 8: Press Install in the Confirm installation selections screen.


The system will install Active Directory Domain Service in the server. You can close the window before completion also.


Installing domain controller

Step 1: Once the installation completed, it will show a message in the Server Manager. Press the message icon and select Promote this server to a domain controller link.


The system will open Deployment Configuration screen.

Step 2: Select Add a new forest option selected and type the domain name you prefer in the Root domain name field. For testing purpose, I enter TestAzureDC.com as domain name.


Press Next.

Step 3: Enter the password in the Domain Controller Options screen.


Press Next.

Step 4: As this is a new forest, no action required in the DNS Options screen.


Press Next.

Step 5: Press Next in the Addition Options screen.


Step 6: Leave the default path and press Next in the Paths screen.


Step 7: Review the summary and press Next.


The system will review the prerequisites and show you the result.

Step 8: If the Prerequisites Check is successful, press Install.


The system will install the DC and restart the server.

Step 9: Once the server restarted, login to the server with the AD user.


The VM will show in the RDP.

Installing from the PowerShell

We can even install DNS and AD from the PowerShell script. It will be easy to configure. So to install DNS and AD roles from the PowerShell, login to the VM (DNTDNSVM) and open the Windows PowerShell IDE from Server Manager --> Tools --> Windows PowerShell ISE. Run the following script.
##Installing AD-DS
Import-Module ServerManager
Install-WindowsFeature -Name AD-Domain-Services -ComputerName DNTDNSVM -IncludeAllSubFeature -IncludeManagementTools -Restart

 ##Installing AD DS New AD Forrest
Import-Module ADDSDeployment
Install-ADDSForest -DomainName "testazuredc.com" -InstallDns:$true `
                    -CreateDnsDelegation:$false `
                    -DatabasePath "C:\Windows\NTDS" `
                    -DomainMode "Win2012" `
                    -DomainNetbiosName "TESTAZUREDC" `
                    -ForestMode "Win2012" 
                    -LogPath "C:\Windows\NTDS" `
                    -NoRebootOnCompletion:$false `
                    -SysvolPath "C:\Windows\SYSVOL" `
                    -Force:$true

Test-ADDSForestInstallation -DomainName "testazuredc.com" -NoRebootOnCompletion

While running this script, it will ask the password for the Active Directory Administrator user. Provide the password and confirm.


Once this script ran, it will restart the server. Login with the server with the domain user credential as discussed before.