Windows Azure Access Control Service provides federated authentication and authentication using various identity providers such as Google Id, Windows Live Id, Yahoo Id, Facebook Id, ADFS etc.,
When an application configured with ACS, there are multiple steps happening while authentication and authorization.
When configuring more than one identity providers for an application, browser will re-direct the Login page with list of provider to select the provider. When selecting a provider, browser will re-direct to the login page for the selected provider. The user can login with their credentials and if successful the provider will returns back the security token to the browser that will be used while requesting ACS in next. The ACS use that security token to create the access token and return back with claims to the browser.
In this post, I am planning include the login page of ACS into the application and customizing the same.
Below are the steps I followed –
Setup the application by configuring ACS
As this post talks about customizing the login page, I am taking a sample project that is configured with multiple providers. The below msdn link provides a nice walkthrough for creating a sample project with ACS configuration.
http://www.windowsazure.com/en-us/develop/net/how-to-guides/access-control/
If we run this project, the browser will show a page with list of identity providers. The user can select a particular provider and give their credentials on the re-directed login page.
The source code of a sample application with ACS configuration is available here. This can be used for configuring further steps.
The output of the sample project will be as follows –


The ACS settings will be as follows -


With this sample project, further steps explains how to include the login page which shows by ACS redirected url and customizing the same.
Download the Login page
Step 1: Open the Windows Azure ACS portal by selecting the ACS namespace in the Windows Azure Management portal.
 Step 2: Click the Application Integration link from the left panel. The browser will show the Login Page section with other sections in the middle.
 Step 3: Click the Login Pages hyperlink to open Login Page Integration screen.
Step 4: Select the Relying Party Application for which the login page needs to be customized and integrated with our application.
 Step 5: Click Download Example Login Page button for downloading html page of the login screen. The file will be downloadable locally.
(I downloaded to the project location)
 Step 6: Create a new ASPX page into the Web Project. Name it as Login.aspx.
 Step 7: Open the downloaded login html file into Visual Studio and copy all the section to the Login.aspx page as below.

 Step 8: Open the Web.Config of the application and change the authentication mode from none to forms. To do this, commend the below configuration
The result of this configuration will look as below –
 Step 7: Now run the application and verify the result. The browser will show the login page with the application URL as below
http://localhost:21212/Login.aspx?ReturnUrl=%2fdefault.aspx%3f
 Step 8: Press any provider and login with the credentials. When the login is successful, the ACS will return the claims to the application. But, currently we might get some error The HTTP verb POST used to access path '/' is not allowed. as defined below screenshot.
 Step 9: To resolve this error, open the Relying Party Application and change the Return URL with the return page name in the URL. For Ex: http://localhost:21212/Default.aspx
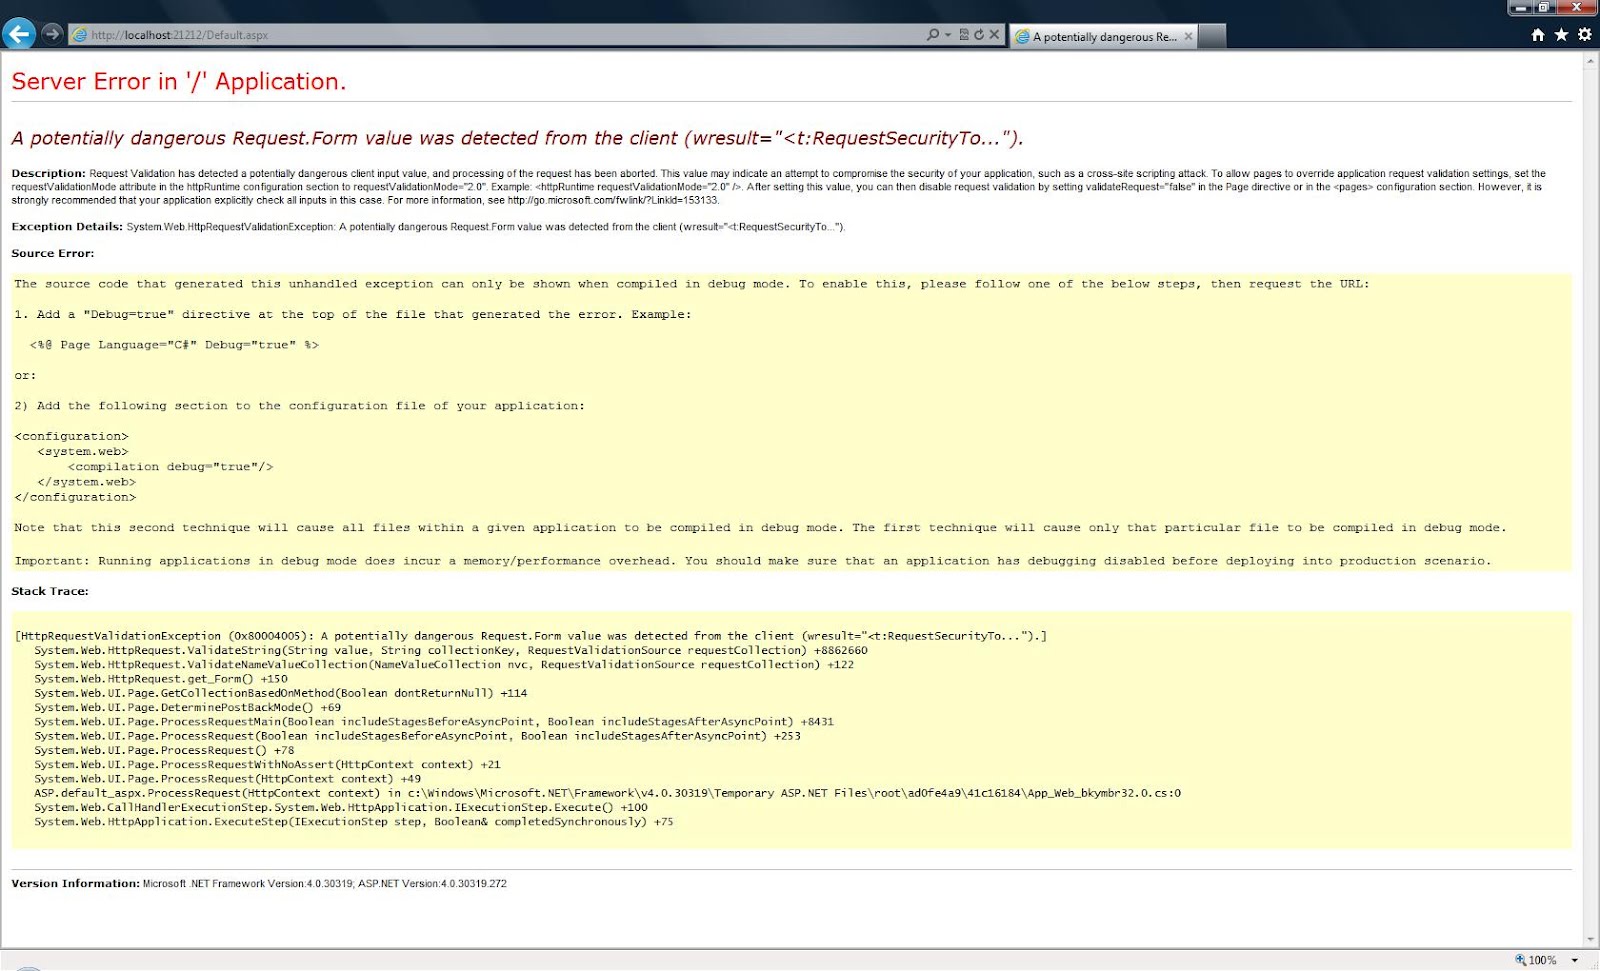
 Step 10: Run the application again and select the provider to login. When successful, the browser might show an error A potentially dangerous Request.Form value was detected from the client (wresult="<t:RequestSecurityTo..."). as below.

Step 11: To resolve this error, open the Default.aspx (return page from ACS) and add an attribute ValidateRequest="false" into the page declarative.
 Step 12: Run the application again. Now it should work without error.

Currently the Login.aspx page (copied from downloaded example page), has logic to store the recent selected providers in cookie and to show when next time visit. If we don’t required we can remove all those logic. The necessary requirement is to redirect to the corresponding provider login page when selecting a particular provider. So the URL of the login page is needed on each provider link.
To customize the login page, I am planning to show list of providers with the buttons as we already seen without having any cookie enabled in it. This might give an idea of where the url is assigned and how to change further.

download the source code after implementing the login page here.
If we want to sign out from the session, we required to close the browser or clear the cache. The next post explains about implementing the sign-out functionality.
When an application configured with ACS, there are multiple steps happening while authentication and authorization.
When configuring more than one identity providers for an application, browser will re-direct the Login page with list of provider to select the provider. When selecting a provider, browser will re-direct to the login page for the selected provider. The user can login with their credentials and if successful the provider will returns back the security token to the browser that will be used while requesting ACS in next. The ACS use that security token to create the access token and return back with claims to the browser.
In this post, I am planning include the login page of ACS into the application and customizing the same.
Below are the steps I followed –
Setup the application by configuring ACS
As this post talks about customizing the login page, I am taking a sample project that is configured with multiple providers. The below msdn link provides a nice walkthrough for creating a sample project with ACS configuration.
http://www.windowsazure.com/en-us/develop/net/how-to-guides/access-control/
If we run this project, the browser will show a page with list of identity providers. The user can select a particular provider and give their credentials on the re-directed login page.
The source code of a sample application with ACS configuration is available here. This can be used for configuring further steps.
The output of the sample project will be as follows –


The ACS settings will be as follows -


With this sample project, further steps explains how to include the login page which shows by ACS redirected url and customizing the same.
Download the Login page
Step 1: Open the Windows Azure ACS portal by selecting the ACS namespace in the Windows Azure Management portal.


Step 4: Select the Relying Party Application for which the login page needs to be customized and integrated with our application.

(I downloaded to the project location)


<authentication mode="None" />And uncomment the below configuration
<!--<authentication mode="Forms"><forms loginUrl="~/Account/Login.aspx" timeout="2880" /></authentication>-->Change the login URL to the login page we just added.
The result of this configuration will look as below –

http://localhost:21212/Login.aspx?ReturnUrl=%2fdefault.aspx%3f


Step 11: To resolve this error, open the Default.aspx (return page from ACS) and add an attribute ValidateRequest="false" into the page declarative.


Currently the Login.aspx page (copied from downloaded example page), has logic to store the recent selected providers in cookie and to show when next time visit. If we don’t required we can remove all those logic. The necessary requirement is to redirect to the corresponding provider login page when selecting a particular provider. So the URL of the login page is needed on each provider link.
To customize the login page, I am planning to show list of providers with the buttons as we already seen without having any cookie enabled in it. This might give an idea of where the url is assigned and how to change further.
<div id="Main">
 <div id="Banner" class="Banner"><b>Sign in to Customized Login Page</b></div>
 <div id="SignInContent" class="SignInContent">
  <div id="LeftArea" class="LeftArea">
   <div class="Header">Sign in using your account on:</div>
   <div id="IdentityProvidersList"></div><br />
  </div>
 </div>
</div>
<script language="javascript" type="text/javascript">
    var identityProviders = [];

    // This function will be called back by the HRD metadata, and is responsible for displaying the sign-in page.
    function ShowSigninPage(json) {

        identityProviders = json;

        if (identityProviders.length == 0) {
            var mainDiv = document.getElementById("SignInContent");
            mainDiv.appendChild(document.createElement("br"));
            mainDiv.appendChild(document.createTextNode("Error: No identity providers are associated with this application."));
        }

        for (var i in identityProviders) {

            var idpList = document.getElementById("IdentityProvidersList");
            var button = document.createElement("button");
            button.setAttribute("name", identityProviders[i].Name);
            button.setAttribute("id", identityProviders[i].LoginUrl); // This is the url of the provider login page. We are assigning to the id
            button.className = "IdentityProvider";
            button.onclick = IdentityProviderButtonClicked;
            button.appendChild(document.createTextNode(identityProviders[i].Name));

            idpList.appendChild(button);

            i++;
        }

    }

    // Sets a cookie to remember the chosen identity provider and navigates to it.
    function IdentityProviderButtonClicked() {
        window.location = this.getAttribute("id"); // Getting the Id value, it means the url of the provider login page and re-directing to that page.
        return false;
    }
</script>
When running the page, the look and fell will be same as and just the heading will be changed. This is because, I did not do much customization. It can be extended to use as our needs.
download the source code after implementing the login page here.
If we want to sign out from the session, we required to close the browser or clear the cache. The next post explains about implementing the sign-out functionality.
0 Responses to “Hosting and customizing the ACS login page with the application”
Post a Comment