As part of Business Intelligence experience with Windows Azure, Microsoft introducing a cloud based reporting service – SQL Azure Report Service. SQL Azure Reporting Service works the same as SQL Server Reporting Service – but runs on cloud with some limitation such as it connects only with SQL Azure database.
Currently SQL Azure Reporting Service is in CTP release and will be available for production shortly. As the service is in CTP, there is no cost involved for doing any POCs on this service. But we have pay for the data transfer from the SQL Azure server.
In this post, I am planning to explain step by step walkthrough to create and publish a normal report on SQL Azure Reporting Service.
Preparing a database
We are going to use Northwind database in this example. So make sure to setup Northwind database.
Creating a New SQL Azure Reporting Server
Step 1: Select Reporting menu from the Quick Launch of Azure Management Portal and select Create a new Sql Azure Reporting Server.

Step 2: The system will pop up a window with Terms of use with a check box for agree. Read the terms and check the agree box. Click Next.

Step 3: Select the subscription which you want to create the Reporting Server and select the Region.
Note: Select the region in the same region where your database located (going to use for reporting). Data transfer in the same region (sub region) will be free.

Select Next.
Step 4: You required providing Login credentials for accessing the server and the reports. You can provide any name (except admin, administrator, sa, root, guest, dbmanager and loginmanager) and password.
Select Finish.
The system will provision the Reporting Server and add under the subscription selected.

The server will provision the server and will add the server under the selected subscription.

Now we provisioned the Reporting Server and ready to deploy the report into it.
Get the Web Service URL
As the SQL Azure Reporting Server is a cloud based reporting server, the reports can be published and accessed through a Web Service URL. So before going for publishing the reports, we required to know the URL.
Step 1: Select the SQL Azure Reporting Server which required to be used for report publishing. In the middle of the screen, you can find the Server Information (from the Server Home: XYZ screen).

Step 2: Note the Web Service URL (Ex: http://dfb8501gck.reporting.windows.net/reportserver) and keep it for next section when configuring the Reporting Server project for publishing.
Developing a Report in BITS
For creating a report for SQL Azure/SQL Server Reporting Server you required to install either BITS (SQL Server Business Intelligence Development Studio) or SQL Server 2008 R2 Report Builder. In this example, I am going to use BITS for developing a report by connecting Northwind database we just created.
Note: For connecting SQL Azure database from on-premise, the TCP outbound port 1433 must be open on your system (or the firewall). In case if you are unable to connect SQL Azure database from on-premise system, you can do the reports using local SQL Server. When publishing the reports to Azure, make sure to change the data source pointing to SQL Azure (check Publishing the Project/Report section Step 1 to 5.
The following walkthrough uses SQL Azure database connecting from on-premise and publishing.
Step 1: Open BITS (SQL Server Business Intelligence Development Studio) on your system and create a new Reporting Server Project (Ex: ReportingDemo).


Visual Studio will create a solution and add related folders.
Step 2: Right click the Reports folder from Solution Explorer and select Add New Report menu.

Visual Studio will pop up a window Report Wizard.
Step 3: The first step for creating report is to provide a data source for getting the records. There will be two options provided, one is to select from existing data source or can create a new one.
Select the New Data Source (by default it will be selected) and provide understandable name for the data source. The Type dropdown provide lots of options such as SQL Server, SQL Azure, Oracle, XML etc., as I already told you can design with any type, but when publishing it must be changed to SQL Azure. Currently we will use SQL Azure database.

Step 4: If you have connection string already constructed, you can provide in the connection string text box otherwise, select Edit.
The Edit option will pop up a Connection Properties window for gathering SQL Azure database information.
Step 5: Provide your SQL Azure server and database details and test the connection using Test Connection. If connection succeeded, press OK.


The connection string will be populated in the Connection String text box at the Report Wizard window. (you can save the connection string for further use).

Press Next for next window.
Step 6: You are required to provide the query for fetching the record from database. If you have the query already, paste it into text box. If not, you can build the query from Query Builder.
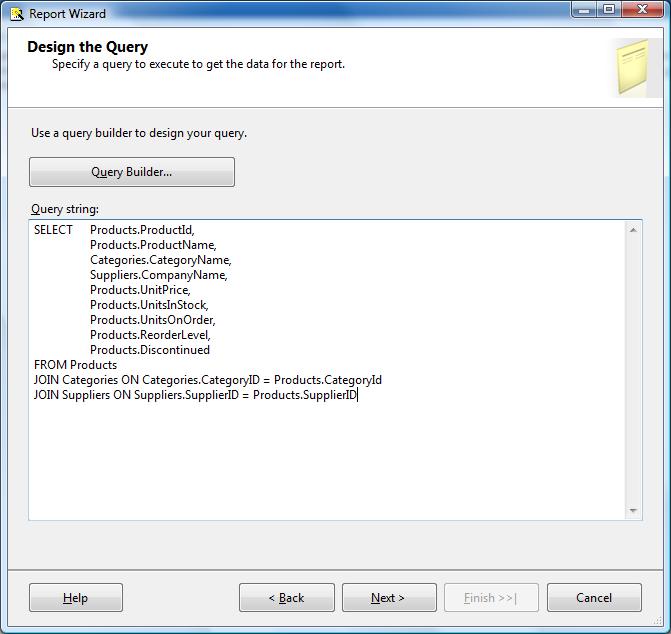
The query used for this demo is below. You can use the same or as you need.
SELECT Products.ProductId,
 Products.ProductName,
 Categories.CategoryName,
 Suppliers.CompanyName,
 Products.UnitPrice,
 Products.UnitsInStock,
 Products.UnitsOnOrder,
 Products.ReorderLevel,
 Products.Discontinued,
FROM Products
JOIN Categories ON Categories.CategoryID = Products.CategoryId
JOIN Suppliers ON Suppliers.SupplierID = Products.SupplierID
Press Next for next window.
Step 7: In the next window, you can select which type of report is required. As this is for demo and a normal report, I selected Tablular.

Press Next for next window.
Step 8: You required to select the columns for Details, Group and Page. Columns in the Details will show in the tabular as a column, Group columns are grouping the details and shows once for each group. Page columns split the page and show in the starting of the page.

Select the column as shown in the picture and press next.
Step 9: Select the layout of the report and press Next.

Step 10: Select the style and press Finish.

Step 11: The wizard will show the details provided. Change the Report Name and press Finish. (If preview required once report created, check the preview option)

The Visual Studio will create the report and add to solution explorer. You can verify the preview or change the design as required and make ready for publish.

For further steps, visit the next post (Getting Started with SQL Azure Reporting Service–Part 2).
0 Responses to “Getting Started with SQL Azure Reporting Service–Part 1”
Post a Comment