In last posts, we had created VPN and one Azure VM. We also installed Domain Controller on the Azure VM. In this post, I am planning to create three Azure VMs with SQL Server 2012 Image and configure mirroring. We will use this SQL Server for connecting from the Web Server in future posts.
The following Steps for creating first SQL Server 2012 VM under the VPN on Azure.
Creating first SQL Server 2012 VM
Step 1: Open the Management Portal and press NEW --> COMPUTE --> VIRTUAL MACHINE --> FROM GALLERY.

Portal will popup to select the Image.
Step 2: Select Microsoft SQL Server 2012 Evaluation Edition and press Next.

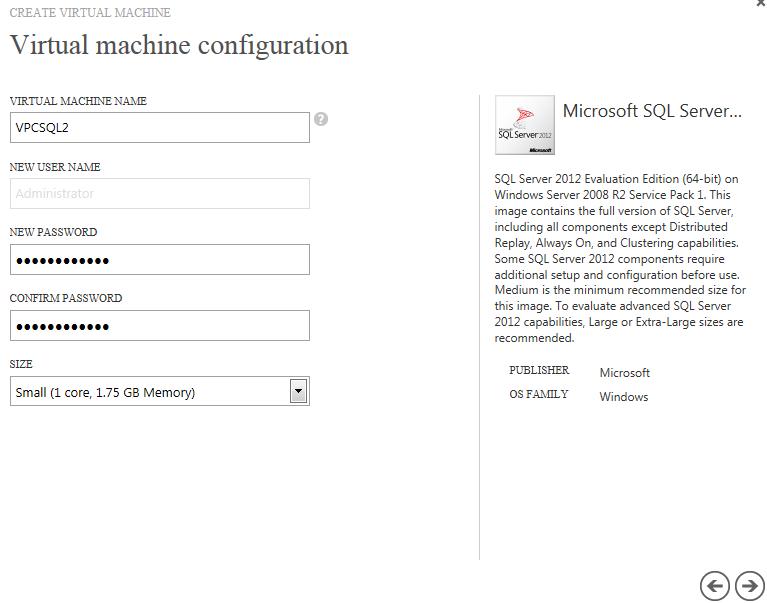
Step 3: Provide the Virtual Machine Name and password. Select the Size of the VM and press Next.

Step 4: As I creating these three SQL VMs under VPN, I don’t have to connect to any particular VM while creating it. Because, all the VMs under the VPC/VPN are connected together and any VM created on the network can able to communicate with SQL Server instances.
Also to note, when choosing STANDALONE VIRTUAL MACHINE, Azure will create a new cloud service and keep the VM under the cloud service and when choosing CONNECT TO AN EXISTING VIRTUAL MACHINE, it will keep the VM under the existing cloud service which was created for the connected VM. This concept is useful for combining more than one VM under a same cloud service and makes them load balanced and set highly available.
In this scenario, I am planning to keep all three SQL VM under a single cloud service and make them highly available (using Availability Set). This will make sure if once VM goes down, other VM can respond back.
In the next screen, provide the DNS Name of the cloud service and select storage account. Select the VPN which was created in the first post of this series. The VPN/VPC will show under the Virtual Networks in the dropdown.
Select the Back End Subnet (BE Subnet) in the VIRTUAL MACHINE SUBNETS dropdown box. This is a concept network for segregating the VMs into different subnets.

Press Next.
Step 5: In the next screen, select the Create availability set from the AVAILABILITY SET dropdown. Enter the Availability Set name (a unique name) in the text box and press Complete.
Availability set: The concept of availability set is used for keep the VMs in to totally different rack. So, it ensures the VMs are physically separated each other such as hardware, software, power, network etc., Because the VMs are separated each other, if one VM got some issue such as hardware failure, network failure, power failure etc., the other VM is still available for responding. In this way, we can make sure the VM are highly available.

Azure will create a new VM and keep it under the VPC selected.
Creating another two SQL Server VM
Now we have created one SQL Server 2012 VM, we need to create another two SQL Server VMs for configuring SQL Mirroring.
The SQL Mirroring is used for achieving high availability on SQL Server. SQL Mirroring can even possible to configure with two SQL Server instances. But, when using three SQL instances one will act as primary instance, one will act as mirroring instance and third will act as witness server. When primary fails, the mirroring instance will become active. All reads, writes goes always to primary instance and will be replicated to mirror instance.
(Note: Microsoft informed SQL Mirroring is planned for depreciation and introduced Always On Availability Groups with SQL Server 2012 version. Currently SQL Server 2012 image on cloud won’t support this feature. So I am using SQL Mirroring.)
Step 1: Create a new VM as the same way by pressing NEW button and selecting NEW --> COMPUTE --> VIRTUAL MACHINE --> FROM GALLERY. Select Microsoft SQL Server 2012 Evaluation Edition and press Next.
Step 2: Provide the Virtual Machine Name and password for the second SQL VM. Select the Size of the VM and press Next.
Step 3: In the next screen, choose CONNECT TO AN EXISTING VIRTUAL MACHINE and select first SQL Server DNS. Make sure the BESubnet selected.
I am selecting an existing SQL Server VM as I want both the VM to sit under same cloud service and I can make them in different Availability set.

Press Next.
Step 4: Select the SQL Mirroring in the AVAILABILITY SET dropdown. (Remember, this is the availability set we created when creating first SQL Server VM).

Press Complete to create VM.
Step 4: As we created the second SQL Server VM, create another one VM (for Witness server) with VPCSQL3 as VM Name.
Creating SQL Server VMs from Powershell script
We can even create these three SQL Server VMs from PowerShell script also. Below is the script which will complete the jobs of creating all three VMs and updating them in Availability Set.
Set-AzureSubscription -SubscriptionName "Subscription-1 Introductory special" -CurrentStorageAccount azurevpntest

$dns = New-AzureDns -Name 'testazuredc.com' -IPAddress '10.79.1.4'

$pass = 'password@123'
$iisimage = 'MSFT__Windows-Server-2012-Datacenter-201210.01-en.us-30GB.vhd'

$iisvm1 = New-AzureVMConfig -Name 'RVPCSQL1' -InstanceSize Small -ImageName $iisimage -AvailabilitySetName SQLMirror |
 Add-AzureProvisioningConfig -WindowsDomain -Password 'password@123' -Domain 'testazuredc' -DomainPassword 'password#123' -DomainUserName 'testazuredc.com\administrator' -JoinDomain 'testazuredc.com' |
 Set-AzureSubnet -SubnetNames 'BESubnet'

$iisvm2 = New-AzureVMConfig -Name 'TVPCSQL2' -InstanceSize Small -ImageName $iisimage -AvailabilitySetName SQLMirror |
 Add-AzureProvisioningConfig -WindowsDomain -Password 'password@123' -Domain 'testazuredc' -DomainPassword 'password#123' -DomainUserName 'testazuredc.com\administrator' -JoinDomain 'testazuredc.com' |
 Set-AzureSubnet -SubnetNames 'BESubnet'

$iisvm3 = New-AzureVMConfig -Name 'VPCSQL3' -InstanceSize Small -ImageName $iisimage -AvailabilitySetName SQLMirror |
 Add-AzureProvisioningConfig -WindowsDomain -Password 'password@123' -Domain 'testazuredc' -DomainPassword 'password#123' -DomainUserName 'testazuredc.com\administrator' -JoinDomain 'testazuredc.com' |
 Set-AzureSubnet -SubnetNames 'BESubnet'

# Create Azure Cloud Service and Create VMs
#New-AzureVM -ServiceName 'TSQLMirroring' -VMs $iisvm1, $iisvm2, $iisvm3  -AffinityGroup 'DNTAG' -VNetName 'DNTVPN' -DnsSettings $dns
In some situation, we might created some VMs from the Management portal and wanted to add other VMs from Power shell. The following script I creating a VM (VPCVM3) and adding to the existing cloud service under the same VPN.
Set-AzureSubscription -SubscriptionName "Subscription-1 Introductory special" -CurrentStorageAccount azurevpntest

$dns = New-AzureDns -Name 'testazuredc.com' -IPAddress '10.79.1.4'

$pass = 'password@123'
$iisimage = 'MSFT__Windows-Server-2012-Datacenter-201210.01-en.us-30GB.vhd'

$iisvm3 = New-AzureVMConfig -Name 'VPCSQL3' -InstanceSize Small -ImageName $iisimage -AvailabilitySetName SQLMirror |
 Add-AzureProvisioningConfig -WindowsDomain -Password 'password@123' -Domain 'testazuredc' -DomainPassword 'password#123' -DomainUserName 'testazuredc.com\administrator' -JoinDomain 'testazuredc.com' |
 Set-AzureSubnet -SubnetNames 'BESubnet'

# Create Azure Cloud Service and Create VMs
New-AzureVM -ServiceName 'SQLMirroring' -VMs $iisvm3
If you note, I am not providing the VPN name, Affinity Group or DNS settings details. When none of this three information provided and the cloud service is already exist, then the VM will add to the existing cloud service.
Adding VMs to the domain controller
Joining the VMs to DNS
Once the VM added by joining a domain controller, we can login with the domain credentials. In Azure, the machines are created in domain join and login is happening with AD credentials. But the computer is still running in workgroup. Not sure what is happening. So I need to join the computer by configuring IP address of the domain controller and joining to the DNS.
So, open each of the system and repeat the following steps to join the domain.
Configuring DNS IP Address
Step 1: Open the Network and Sharing Center and Local Area Connection 4 window. Press Properties to get the properties window.


Step 2: Select the Internet Protocol Version 4 (TCP/IPv4) and press Properties.

Step 3: Provide the IP address of the Domain Controller VM IP address.

Step 4: Press OK and close all the windows.
Joining the Computer to Domain
Step 1: Open the system Properties and select the Change Settings under Computer name, domain, and workgroup settings.


Step 2: Press Change in the System Properties window. Select the Domain from the Member Of section and provide the domain name.


Step 3: Provide the AD credentials for joining to the domain.

You will get the Welcome message. Press OK to continue. The system will restart after your confirmation.
Verify the system properties to get to know the computer is joined to the domain.

The same can be repeated for other two systems to join into the domain controller.
In the next post, I will walkthrough configuring SQL Mirroring using these three VMs.
0 Responses to “Creating VPN and Hosting Web application on Azure - Part 4”
Post a Comment